

In part 1 I gave you most and hopefully all the needed information to prepare your leather and get started cutting your pattern. If I was missing something I would be interested to hear back from you what you were missing. Part 2 is all about beveling.
Beveling isn’t hard, but it has to be done right.
If you are wanting to make some inverted carving you should note that the only real difference is that there's no backgrounding work and the outer lines, which would usually be beveled towards the background to raise the figure, will be beveled towards the figure.
Now that I clarified this let’s start with the topic of beveling. There are multiple beveling stamps. We can categorize them as smooth and textured bevelers.

Of course those are just the Craftool ones, but let’s face it, there aren’t too many variations of the displayed ones.
Choosing the right beveler for your project is important and they differ in their use a little. To see what they look like on leather check this link. The bevel line should be even and show no walking marks. How do you achieve this result? I’ll start with the smooth beveler.
Place it on the cut and hit it… No, you don’t just do it like that. If you do, chances are you misaligned your stamp. The desired result is to have a straight line down towards the bottom of your cut and have the “figure” raised and the other side compressed properly. To achieve this you will have to tilt the stamp a little towards you as the slanted side will naturally cause the stamp to tilt forward (away from you) once you hit it. And it really doesn’t make any difference if you’re using a poly mallet or maul. This is plain physics. Yes, the crap that sucked back in school… After you made your first impression with your smooth beveler you’ll place the stamp only half width over to the next and continue like that. It’s important that you hit the stamp each time with about the same force to achieve an even result. If your leather is too wet it will be impossible to avoid walking marks. If you still have walking marks I’m having a little trick for you. You can and should stroke the bevel line after you stamped it. You will need quite some strength for this task and a solution is given to us by Al Stohlman. The picture is an exert from his book “Leathercraft Tools“. It’s an informative book about the tools of the trade on how to use and maintain them. If you are using the push beveler, make sure you keep it perpendicular and don’t tilt it to the left or right side. As for any other tool, you should use a well polished beveler to make your push beveler and keep it this way. Just as with your swivel knife, don’t have the strength come out of your elbow or shoulder. Let your wrist do the job. That’ll be sufficient and you’ll avoid to run it off track.
If you inspected your bevelers you recognized that they vary not just in size but also in their angles. The steeper ones are considered steep bevelers. You’ll need them mainly to reach deeper into the leather. Be careful with them on thin leather. You can easily make a hole into your project with them.
Again you need to think about the correct side which you want or should bevel. It can make a figure look right or wrong. For beginners the Al Stohlman books are very recommendable. They provide pictorial guidance and some really good insight into the art. Once you completed a few of these projects you will know where and what to bevel. Many craftsman started with the Stohlman book series.
Let’s say you beveled all lines in your project and you shouldn’t start with anything else before you didn’t complete this step. I’m always doing this as my first stamping routine. If there are sections in there where the bevel should have some texture you can use a textured beveler right away or do it like I do it. Use the smooth beveler first and come back with the textured beveler later. This way I’m limiting walking marks to a minimum and you really want to achieve is a clear impression of the texture which isn’t very deep. Yes, this is an extra step, but I’m willing to take it as the result speaks for itself.
Okay that’s the simple part of beveling and as you can imagine not the only thing that can be said on beveling. It really becomes interesting if you start figure carving and most people start with roses and other floral objects. 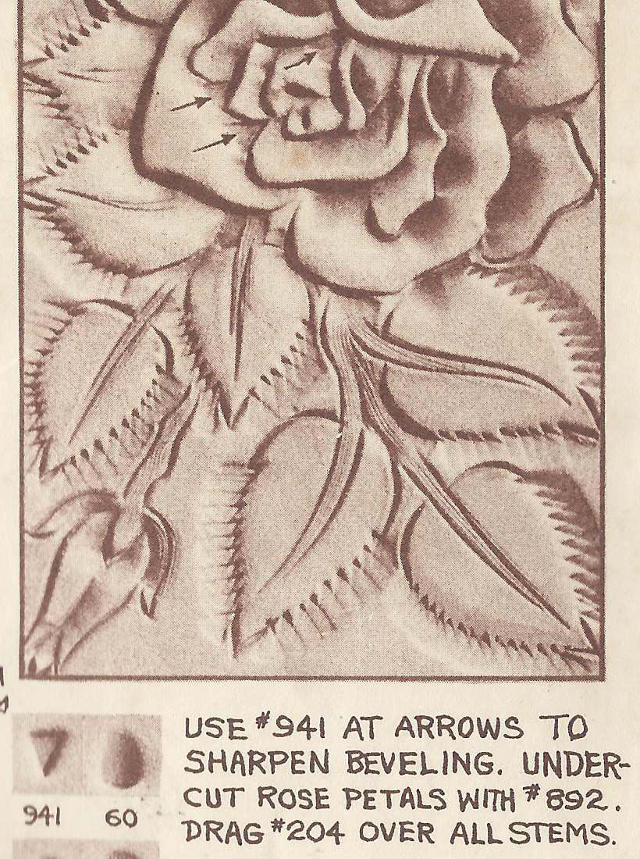 From the book “How to Carve Leather” by Al Stohlman this picture shows how to bevel a rose leaf. Once you figured out how it’s been done it’s really simple. Stohlman suggest to use stamp #F941. Depending on how individual you want to have the leaves you could also use some veiner stamps like #F912L and F912R. Using the #F941 as suggested is great and simple but as you can see has a downturn to it. Walkingmarks! Don’t punch too hard and not too deep. Leave some material to the background tool. Leather can only be compressed so much and if you make this one too deep you will be left with visible lines you won’t be able to remove afterwards and will even show with really dark dyed background.
On the same picture you’ll see that an undercut has been used to lift the individual sections of the petals. What you don’t see is that these sections have been beveled before that. Sometimes you can see that people skip that step and use the undercut or lifter right away and bevel the remainder after. This may be personal preference, but certainly the undercut stamp is used uncontrolled to some extend. Another option and this may be even better is to use a pro petal like it’s demonstrated here.
This is about it there is to say on beveling. The only thing that’s left to say is that you should always bevel as deep as your knife cut and make sure that the ground is well rounded, you’ll see if it’s still rough. And then again, if you’re planing of antiquing you final product you might want to have it a little rough in the ground as this takes the dye better and will stay darker.
If you are wanting to make some inverted carving you should note that the only real difference is that there's no backgrounding work and the outer lines, which would usually be beveled towards the background to raise the figure, will be beveled towards the figure.
Thank you for reading. Hoping I was able to help you, I’m leaving you for now and will work on part 3 of this series in which I’ll be writing about the next step in our process.